Tutorials - Steam Inputs
By HarmanSS and Furd
Relevant GodotSteam classes and functions
Note
You may want to [double-check our Initialization tutorial](initializing.md) to set up initialization and callbacks functionality if you haven't done so already.
Prerequisites
Make sure you have setup GodotSteam and have an online depot / build on Steamworks; it does not have to be released to the public.
Assumption
This guide assumes the player will use at most use 1 controller. There are some changes suggested that you can use to handle multiple controllers.
Setting up .vdf files
This info is available on Steamworks, although it is a bit dated. So I am gonna provide more of high-level info here.
In Game Actions file
You can download this simple IGA example to get started. Alternatively, you can also download one of the templates provided by Steam for specific genres. To understand how IGA works, see this breakdown of IGA format.
Rename the downloaded file to whatever you see fit and place wherever works in your project. I call it steam_input_manifest.vdf and place it in my {game}/steam_input/ folder.
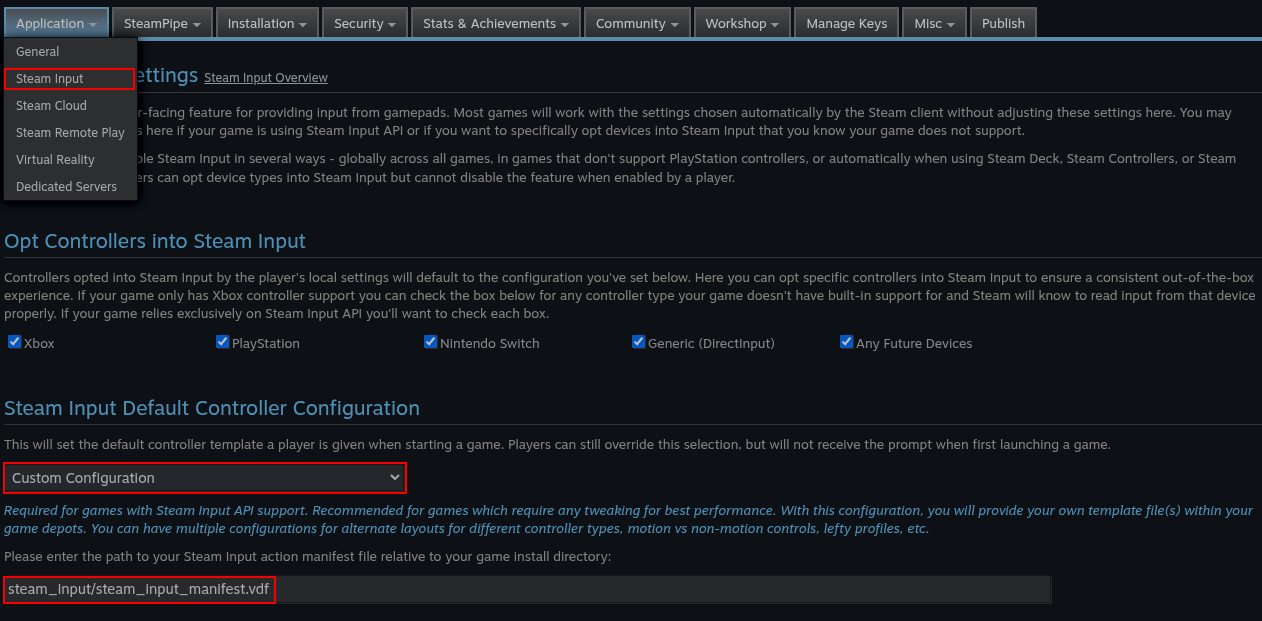
Log into the Steamworks Partner site and go to your Steamworks Admin in the Application tab:
- Choose the Steam Input from the drop down.
- Choose the controllers you want to support.
- Choose Custom Configuration for the most amount of control utilizing Steam Input and sort of Godot-independent controls.
- Enter the path for this custom config (.vdf) file relative to your game directory; using my example it would be steam_input/steam_input_manifest.vdf.
- Save and publish your changes on Steamworks.
Copy the example/template IGA file to the correct location that you set in your game folder; you can right-click on your game in Steam and use Manage -> Browse local files to quickly open the game folder. Set up all the action-sets, actions and layers in the .vdf file as per your needs.
Action Manifest file
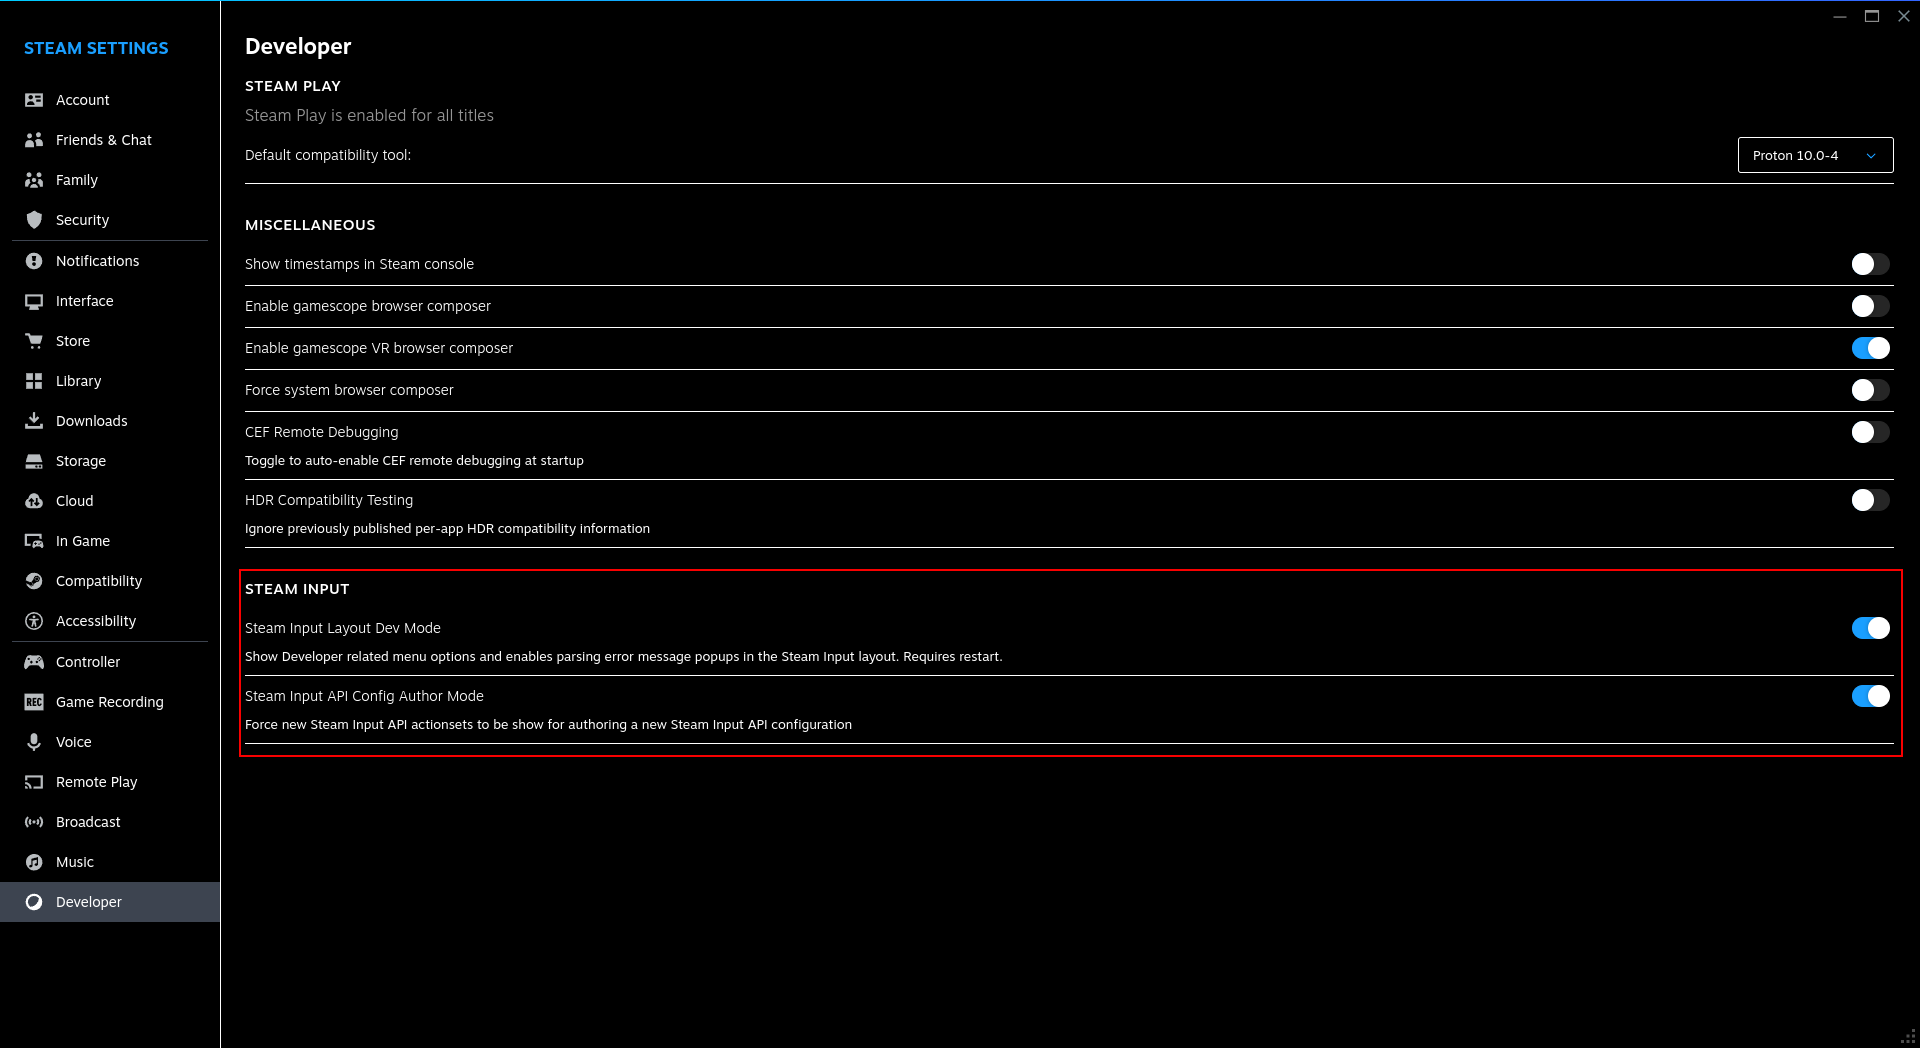
You might need to restart steam with -dev argument. Open Steam settings, there should be Developer tab, and enable both options under Steam Input.
Connect a controller then press the controller icon to open controller configuration. If you see any errors, it is usually because of a typo or incorrect case.
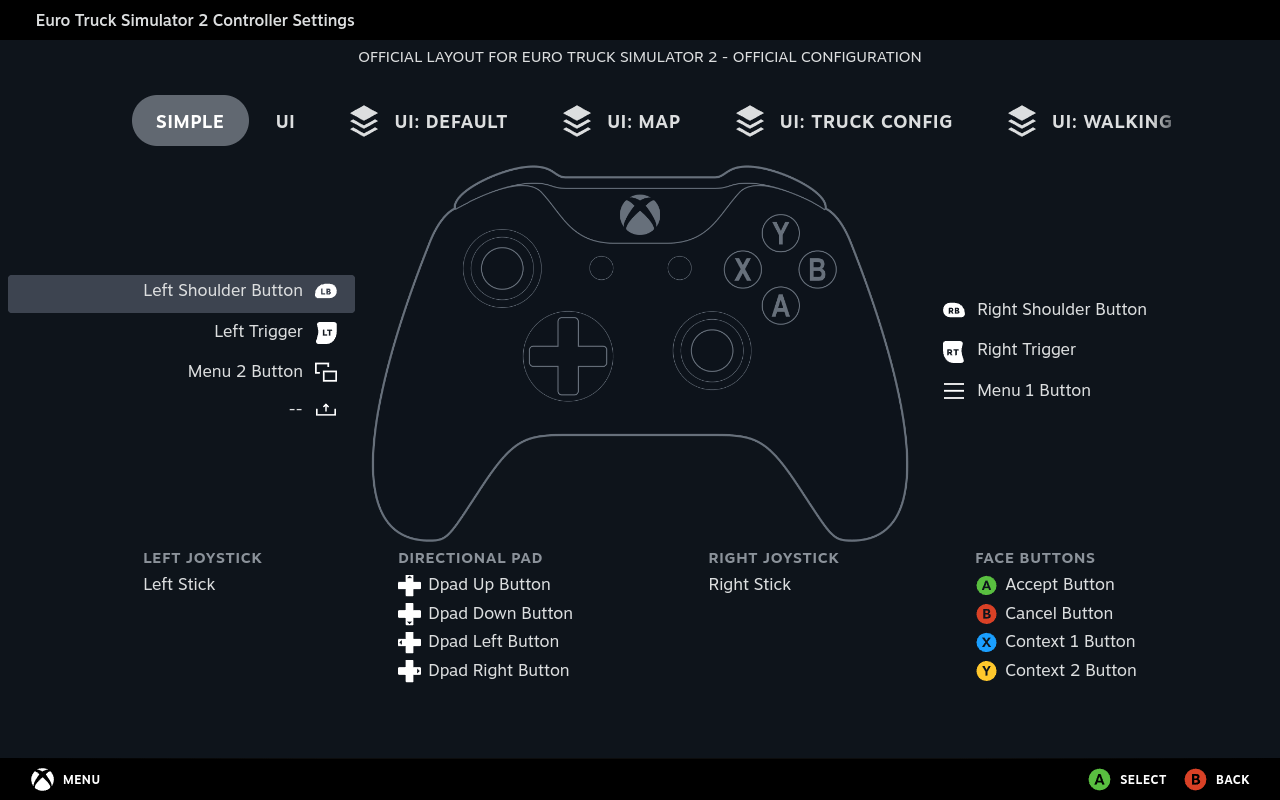
You should see your action-sets and layers. Make a default config and save it using Export Layout. Below is an example from Euro Truck Simulator 2, as you can see it has multiple action-sets and action-set layers as well as custom inputs.
Use the commands below to dump the config in your home or documents folder (it will be called config_{appid}_controller_{type}.vdf). You need the controller to be connected, otherwise these commands might not work.
start steam://dumpcontrollerconfig?appid=X
xdg-open "steam://dumpcontrollerconfig?appid=X"
Move the config to your game input location (for me, it would be {game}/steam_input/). Rename the file if you want to.
Open your IGA file and change the first line from In Game Actions to Action Manifest and add a configuration block (before the actions block). Each controller has a specific name that you can find in Action Manifest guide and the path is relative to the manifest.
-"In Game Actions"
+"Action Manifest"
+"configurations"
+   {
+       "controller_<type>"
+       {
+           "0"
+           {
+               "path" "<controller_config>.vdf"
+           }
+       }
+  }
    "actions"
Exporting Official Configuration
After you have a finalized configuration, you can use the Export Offical Configuration option from the Steam client app, then dump that config and ship with your game.
InputController
This section uses Furd's blog as a base with some modification and additions.
Setup
Create a script input_controller.gd and make it an autoload named InputController. Next, in your Steam autoload/script, add the initialization logic inside the block where Steam is detected as running. This ensures that Steam Input is only set up when the Steam client is available.
If Steam is not running, disable processing for InputController so that only Godot's default input system is used. A simple structure for this logic could look like:
func _ready() -> void:
# steam initialization (I have auto-init enabled, otherwise you would need to manually initialise it), like this:
# var status := Steam.steamInitEx(app_id, true/false)
    var status := Steam.get_steam_init_result()
    if status.status == Steam.STEAM_API_INIT_RESULT_OK:
        Steam.inputInit()
        Steam.enableDeviceCallbacks()
        InputController.init()

# if steam does not initialise, disable the process mode of input controller
# doing so will prevent the _process() method from being called, so no logic in it will function
# if you want to add logic in the _process() method of InputController, then you can implement a check using Steam.isSteamRunning()
    else:
        InputController.process_mode = Node.PROCESS_MODE_DISABLED

# other steam stuff
Back in your InputController, make a dictionary for each action-set, where the key is the name that you defined in your IGA (.vdf) file, and the value is a boolean: true for analog actions that require an analog input like joystick / trigger for character movement and false for all digital actions (buttons).
Your actions in your IGA file and Godot's input map should share the names for all actions for passing the input to Godot if a controller is not connected or if Steam is not running.
Note
Joysticks / triggers can be used as a digital action if you don't need the precise strength. As an example, I use left joystick for navigating UI.
extends Node

const set1_action_names := {
    "ui_accept": false,
    "ui_cancel": false,
    "ui_focus_next":false,
    "ui_focus_prev":false,
    "ui_up": false,
    "ui_down": false,
    "ui_left": false,
    "ui_right": false,
}

const set2_action_names := {
    "move": true,
    "jump": false,
    "shoot": false,
}

enum INPUT_SOURCE { KEYBOARD_MOUSE, JOYPAD}
var last_input_source : INPUT_SOURCE = INPUT_SOURCE.KEYBOARD_MOUSE
var controller_id := -1
var got_handles := false
var actions := {}
var action_states := {}

var set1 := 0
var set2 := 0
var current_action_set: int:
    set(value):
    if Steam.isSteamRunning():
        Steam.activateActionSet(controller_id, value)
        current_action_set = value

var action_glyphs := {}
var cooldown: float = 0.0
var gdt_cooldown: float = 0.0

# The main nodes that needs controller glyphs/icons,
# try to keep this array as small as possible to avoid breaking connections
const nodes_needing_glyphs := [
# nodes that I use for my game, the main `Game` node &
# `Level` that is instantiated after clicking the start game button
    "/root/Game",
    "/root/Game/Level",
]

func init() -> void:
    process_mode = Node.PROCESS_MODE_ALWAYS
    Steam.input_device_connected.connect(_on_controller_connect)
    Steam.input_device_disconnected.connect(_on_controller_disconnect)
    Steam.runFrame()
Note
Remember to change the process_mode to PROCESS_MODE_ALWAYS for both InputController and Steam autoloads, this makes them run even when the game is paused.
Connecting controllers
This guide uses the latest connected controller - only 1 controller at a time. If you want your game to handle multiple controllers, make the variable controller_id an array and append the input_handle then remove it when disconnected.
func _on_controller_connect(input_handle):
    controller_id = input_handle
    get_handles()
    # a timer for a delayed reload of glyphs/icons as sometimes, Steam loads the wrong ones
    var timer: Timer = Timer.new()
    timer.one_shot = true
    timer.timeout.connect(_delayed_reload.bind(timer))
    add_child(timer)
    timer.start(10)

    Steam.run_callbacks()
    Steam.runFrame()

    _preload_glyphs()
    set_glyphs()

    # have some sort of logic to activate the correct set as
    # user can connect controller in the middle of a game
    current_action_set = set1


func _on_controller_disconnect(input_handle):
    actions.clear()
    action_states.clear()
    action_glyphs.clear()
    got_handles = false
    # to pause the game if controller is disconnected while in game
    get_node("/root/Game").on_controller_disconnect()
    controller_id = -1
    set_glyphs()
    last_input_source = INPUT_SOURCE.KEYBOARD_MOUSE
Getting action handles
Note
These methods only work if a controller is connected, otherwise they return 0.
func get_handles() -> void:
    got_handles = true
    set1 = Steam.getActionSetHandle("Set1")
    set2 = Steam.getActionSetHandle("Set2")
    get_action_handles()


func get_action_handles() -> void:
    for action in set1_action_names:
    if set1_action_names[action]:
        actions[action] = Steam.getAnalogActionHandle(action)
    else:
        actions[action] = Steam.getDigitalActionHandle(action)

    for action in set2_action_names:
    if set2_action_names[action]:
        actions[action] = Steam.getAnalogActionHandle(action)
    else:
        actions[action] = Steam.getDigitalActionHandle(action)
You might need a helper function to change the current action set. For example, if you have two sets, one for in-game and one for UI, you can change to set1 for UI navigation when you pause and revert to set2 when you resume the game.
Here's how I do it in my game: I have a global enum for location and whenever I change my location, I call this method:
func change_action_set(location):
    match location:
    Enums.START_MENU:
        current_action_set = set1
    Enums.LEVEL:
        current_action_set = set2
    Enums.PAUSE_MENU:
        current_action_set = set1
Input Wrappers
To be able to use handle both keyboard and controller inputs at the same time, we are going to create some wrapper functions that fall back to Godot input if no controller is connected; controller_id = -1 is used for keyboard.
Analog actions
Since analog actions are typically used for getting strength / direction from an input, I am not implementing any input cooldown for these. I didn't use any analog actions for my project, as such these functions are ripped right out of Furd's blog.
get_action_strength()
Useful for single axis of a joystick or a trigger; returns a float from 0 to 1.
Steam's getAnalogActionData() function returns a Vector2 with the x and y values of the action but the y value is always 0 for single axis inputs such as triggers. By only returning the x value we can emulate Godot's get_action_strength() function.
func get_action_strength(action: StringName, device: int = controller_id,  exact_match: bool = false) -> float:
    if device >= 0:
    if not got_handles: return 0

    var action_data = Steam.getAnalogActionData(device, actions[action])
    return action_data.x
    return Input.get_action_strength(action, exact_match)
get_axis()
Useful for creating a single value from two opposing actions; returns a float between -1 to +1.
func get_axis(negative_action: StringName, positive_action: StringName, device: int = controller_id) -> float:
    if device >= 0:
    if not got_handles: return 0

    var negative = Steam.getAnalogActionData(device, actions[negative_action])
    var positive = Steam.getAnalogActionData(device, actions[positive_action])
    return positive.x - negative.x
    return Input.get_axis(negative_action, positive_action)
get_vector()
Useful for movement/steering using joysticks; returns a normalised Vector2.
This function is intended for directional movement only, not analog magnitude. The returned vector has a maximum length of 1.0. The "y" value from Steam is inverted from Godot, so we invert it to make it consistent to the existing Godot function:
func get_vector(negative_x: StringName, positive_x: StringName, negative_y: StringName, positive_y: StringName,
    device: int = controller_id, deadzone: float = -1.0) -> Vector2:
    if device >= 0:
    if not got_handles: return Vector2.ZERO

    var negative_x_val = Steam.getAnalogActionData(device, actions[negative_x])
    var positive_x_val = Steam.getAnalogActionData(device, actions[positive_x])
    var negative_y_val = Steam.getAnalogActionData(device, actions[negative_y])
    var positive_y_val = Steam.getAnalogActionData(device, actions[positive_y])

    return Vector2(positive_x_val - negative_x_val, -(positive_y_val - negative_y_val)).normalized()
    return Input.get_vector(negative_x, positive_x, negative_y, positive_y, deadzone)
get_move_input()
In order to use an analog joystick from Steam Input, we define a name for the input in the Steam In-Game Actions File. In this example, I've named it "move". In Godot, I'm querying the Left / Right and Up / Down actions but they could be named whatever you define yourself.
This is one of the few functions that don't share the same name action names between Steam Input and Godot Input:
func get_move_input(device: int = controller_id) -> Vector2:
    if device >= 0:
    if not got_handles: return Vector2.ZERO

    var action_data = Steam.getAnalogActionData(device, actions["move"])
    return Vector2(action_data.x, -action_data.y).normalized()
    return Vector2(Input.get_axis("Left", "Right"), Input.get_axis("Up", "Down")).normalized()
Digital actions
I have a cooldown mechanism for is_action_just_pressed() which prevents any double inputs, especially when pausing / resuming the game. You can implement that for is_action_pressed() here, if you want to create pseudo-echo effect or better yet; implement the cooldown where necessary in the specific place you want it for more granular control. The value for cooldown can be whatever you want it to be; I found that '0.15' is the lowest that prevents most double inputs.
is_action_pressed()
Will return true for as long as the input is held.
func is_action_pressed(action: StringName, device: int = controller_id,  exact_match: bool = false) -> bool:
    if device >= 0:
    if not got_handles: return false

    var current_frame = Engine.get_process_frames()
    if last_input_source == INPUT_SOURCE.JOYPAD:
        var currently_held = Steam.getDigitalActionData(device, actions[action]).state
        set_action_state(action, currently_held, current_frame)
        return currently_held

    return Input.is_action_pressed(action, exact_match)
is_action_just_pressed()
Will return true once, when the button is pressed.
func is_action_just_pressed(action: StringName, device: int = controller_id, exact_match: bool = false) -> bool:
    if device >= 0:
        if not got_handles:
            return false

    if cooldown <= 0:
        var current_frame = Engine.get_process_frames()
        if last_input_source == INPUT_SOURCE.JOYPAD:
            var currently_held = Steam.getDigitalActionData(device, actions[action]).state
            var action_state = set_action_state(action, currently_held, current_frame)
        if currently_held:
            cooldown = 0.15
        return currently_held and action_state.press_frame == current_frame

    else:
        return false

    return Input.is_action_just_pressed(action, exact_match)
is_action_just_released()
Will return true once, when the button is released.
func is_action_just_released(action: StringName, device: int = controller_id, exact_match: bool = false) -> bool:
    if device >= 0:
    if not got_handles: return false

    var current_frame = Engine.get_process_frames()
    var currently_held = Steam.getDigitalActionData(device, actions[action]).state
    var action_state = set_action_state(action, currently_held, current_frame)
    return not currently_held and action_state.release_frame == current_frame

    return Input.is_action_just_released(action, exact_match)
Setting / getting action states
Automatically creates a value for an action in get_action_state if it does not exist. For supporting multiple controllers, pass device_id as an argument and create a dictionary for each id and this dictionary as the value:
# key/value pairs for action_states dictionary

# single controller
action_name: { "held": false, "press_frame": -1, "release_frame": -1 }

# multiple controllers
# here, the input_handle for controller1 is the key and its value is the above dictionary
controller1: {
 action_name1: { "held": false, "press_frame": -1, "release_frame": -1 },
 action_name2: { "held": false, "press_frame": -1, "release_frame": -1 }
}
func get_action_state(action: String) -> Dictionary:
    if not action_states.get(action):
    action_states[action] = { "held": false, "press_frame": -1, "release_frame": -1 }
    return action_states[action]


func set_action_state(action: StringName, currently_held: bool, current_frame: int) -> Dictionary:
    var previous_action_state = get_action_state(action)

    if currently_held and not previous_action_state.held:
    action_states[action].held = true
    action_states[action].press_frame = current_frame

    elif not currently_held and previous_action_state.held:
    action_states[action].held = false
    action_states[action].release_frame = current_frame

    return action_states[action]
Handling input source change and input cooldown
func _input(event: InputEvent) -> void:
    if event is InputEventKey \
    or event is InputEventMouse \
    or event is InputEventMouseMotion:
    last_input_source = INPUT_SOURCE.KEYBOARD_MOUSE
    # you can remove controller glyphs here,
    # but remember we are simply "changing" input source,
    # the controller is still connected


func _process(delta: float) -> void:
    Steam.runFrame()
    if cooldown > 0:
    cooldown -= delta
    if gdt_cooldown > 0:
    gdt_cooldown -= delta

    if controller_id != -1 \
    and last_input_source == INPUT_SOURCE.KEYBOARD_MOUSE:
    for action in actions.keys():
        if Steam.getDigitalActionData(controller_id, actions[action]).state:
        last_input_source = INPUT_SOURCE.JOYPAD
        break
Controller glyphs / icons
Whenever a controller is connected, _preload_glyphs() is called which loads glyphs; Steam automatically detects the controller type and gets the glyphs for that controller. If you add an action-set, remember to add it in the local sets variable.
Sometimes incorrect glyphs are loaded; to counteract this, I have a _delayed_reload() method which reloads the glyphs after ten seconds and deletes the temporary timer. You should keep the size as large for maximum clarity and adjust the node's property to fit the glyph as per your needs. You can look other glyph styles here.
The functions getAnalogActionOrigins() and getDigitalActionOrigins() return an array, containing all buttons that the action might be bound to. I use the first element for glpyhs but you can use all the origins and have the icons rotate between themselves. If you decide to do so, remember to modify the load_glyphs() (which is discussed later) function to accommodate it.
func _preload_glyphs() -> void:
    var sets := [set1, set2]

    for set_id in sets:
    Steam.activateActionSet(controller_id, set_id)
    Steam.runFrame()

    for action_name in actions.keys():
        var origins := []

        if is_analog_action(action_name):
        origins = Steam.getAnalogActionOrigins(controller_id, set_id, actions[action_name])
        else:
        origins = Steam.getDigitalActionOrigins(controller_id, set_id, actions[action_name])

        if origins.size() == 0:
        continue

        var style := Steam.INPUT_GLYPH_STYLE_DARK | Steam.INPUT_GLYPH_STYLE_SOLID_ABXY
        var path = Steam.getGlyphPNGForActionOrigin(origins[0], Steam.INPUT_GLYPH_SIZE_LARGE, style)
        var img = Image.new()
        if img.load(path) == OK:
        var tex :Texture2D = ImageTexture.create_from_image(img)
        action_glyphs[action_name] = tex


func get_glyph(action_name: StringName):
    if action_glyphs.has(action_name):
    return action_glyphs[action_name]

    else:
    return null


func _delayed_reload(timer: Timer):
    var current_set: int = current_action_set
    _preload_glyphs()
    set_glyphs()
    current_action_set = current_set
    Steam.runFrame()
    timer.queue_free()
Forcing a specific controller's glyphs
If you want to give the player the option to display a specific controller's glyphs, you can use translateActionOrigin(), which translates (or gives the best guess for) the origin to the equivalent of that controller.
    var player_option := Steam.INPUT_TYPE_XBOXONE_CONTROLLER
    var origin = origins[0]
    if player_option != Steam.getInputTypeForHandle(controller_id):
        origin = Steam.translateActionOrigin(player_option, origin)

    var path := Steam.getGlyphPNGForActionOrigin(origin, Steam.INPUT_GLYPH_SIZE_LARGE, style)
Info
You can see the enums for each controller type [here](../classes/input.md#inputtype).
Converting SteamInput to Godot input
There are some inputs (namely ui_left, ui_right, ui_up, ui_down, ui_focus_next and ui_focus_prev) that are kinda annoying to translate using SteamInput, as you can manually change focus but setting that up is extremely tedious. As such, I use this function for creating an InputEvent in Godot for UI navigation. gdt_cooldown is used to prevent weird input-chaining when creating an event:
func si_to_godot(event_action: StringName):
    if last_input_source == INPUT_SOURCE.JOYPAD\
    and gdt_cooldown <= 0\:
    gdt_cooldown = 0.01
    var event := InputEventAction.new()
    event.action = event_action
    event.pressed = true
    Input.parse_input_event(event)

    var event_release := InputEventAction.new()
    event_release.action = event_action
    event_release.pressed = false
    Input.parse_input_event(event_release)
Note
The UI action names in your IGA file and Godot's input-map should be the same.
Using InputController
Now that you have setup the InputController class, it's time to use it. You simply call the functions that you want to use.
Running game from editor
When running the game from editor, you might have to use the following commands to force SteamInput to work:
start steam://forceinputappid/x
xdg-open "steam://forceinputappid/x"
Loading glyphs / icons
A node in the var nodes_needing_glyphs gets its glyphs like this, where it can set the glyph to a specific node like a button or call load_glyphs() for its children. Remember, get_glyph() returns null or Texture2D.
func _ready(): -> void:
    load_glyphs()


# you can provide a default value here so you don't have it pass it every time
func load_glyphs(controller_connected: bool = InputController.controller_id != -1):
    if controller_connected:
    # for a button, set its property `expand_icon` to true, so the icon shrinks to the button size
    $Button.set_button_icon(InputController.get_glyph("action_name"))

    # for TextureRect, set its property `expand_mode` according to your needs
    $TextureRect.set_texture(InputController.get_glyph("action_name"))

    $ChildNode.load_glyphs(controller_connected)

    else:
    $Button.set_button_icon(null)
    $TextureRect.set_texture(null)
    $ChildNode.load_glyphs(controller_connected)
Getting Input data
Movement
Since we created a specific function for getting the movement vector, we can simply use this:
func _process(delta) -> void:
    velocity = Vector2.ZERO
    velocity = InputController.get_move_input() * speed
    position += velocity * delta
UI navigation
I have this logic in my main "game" node, whose process_mode is PROCESS_MODE_ALWAYS, and this automatically changes the focus how Godot would do natively. If you have a really complex scene, you can manually define the focus neighbors explained here in the Godot docs; for me, Godot's default guesses usually work.
func _process(_delta: float) -> void:
    if InputController.is_action_just_pressed("ui_focus_next"):
    InputController.si_to_godot("ui_focus_next")

    elif InputController.is_action_just_pressed("ui_focus_prev"):
    InputController.si_to_godot("ui_focus_prev")

    elif InputController.is_action_just_pressed("ui_left"):
    InputController.si_to_godot("ui_left")

    elif InputController.is_action_just_pressed("ui_right"):
    InputController.si_to_godot("ui_right")

    elif InputController.is_action_just_pressed("ui_up"):
    InputController.si_to_godot("ui_up")

    elif InputController.is_action_just_pressed("ui_down"):
    InputController.si_to_godot("ui_down")
Note
Whenever you change a scene, remember to use grab_focus() on a Control node. For example, when you start the game, use it to focus the first button in your _ready function.
Other button inputs
I use a combination of Godot's grab_focus() and then InputController.si_to_godot("ui_accept") to confirm.
func _process(_delta: float) -> void:
    if InputController.is_action_just_pressed("ui_accept"):
    InputController.si_to_godot("ui_accept")

    elif InputController.is_action_just_pressed("start_game"):
    start_button.grab_focus()
    InputController.si_to_godot("ui_accept")

    elif InputController.is_action_just_pressed("open_close_settings"):
    settings_button.grab_focus()
    InputController.si_to_godot("ui_accept")

    elif InputController.is_action_just_pressed("exit_game"):
    exit_button.grab_focus()
    InputController.si_to_godot("ui_accept")
Additional Resources
Text Tutorials
Like reading? Check out this terrific text tutorial!
'Integrating Steam Input with Godot 4' by Furd
Example Project
Later this year you can see this tutorial in action with more in-depth information by checking out our upcoming free-to-play game Skillet on Codeberg. There you will be able to view of the code used which can serve as a starting point for you to branch out from.