Tutorials - MultiplayerPeer
One of the more requested tutorials is lobbies and networking through Steam with Godot's MultiplayerPeer. This tutorial specifically covers some of the networking portion and the Lobbies or Friends' Lobbies tutorials should cover the other half. Please note: only use this as a starting point.
I would highly suggest you read some or all of the official documentation to better understand the high-level multiplayer concepts that Godot introduces before continuing on.
Note
You may want to double-check our Initialization tutorial to set up initialization and callbacks functionality if you haven't done so already.
Server, Peers, and Authority
In this tutorial, we will assume that the server is just another player of the game. For dedicated servers, you can check out the Godot documentation on Exporting for dedicated servers; however, GodotSteam's server builds do not contain any MultiplayerPeer functionality. It is in the works though.
The server is the instance of the game that all others connect to. It acts as the hub for the session and always has a peer ID of 1. Every connected participant, including the server itself, is a peer; each identified by a unique ID assigned at connection.
Authority is a per-node concept which defines the peer that owns and controls a given node. The server holds authority over all nodes unless you explicitly reassign it with set_multiplayer_authority().
Lobby and MultiplayerPeer
Connections with SteamMultiplayerPeer requires Steam IDs instead of IP addresses like ENet; getting these is much easier with Steam lobbies.
The player creating the lobby will function as the server and the default authority for all nodes. We can create the server once we get the callback that the lobby is created.
func _on_lobby_created(connect: int, _this_lobby_id: int) -> void:
    if connect == 1:
        # Do other lobby initialization here
        # Create host peer
        var peer: MultiplayerPeer = SteamMultiplayerPeer.new()
        peer.create_host(0)
        peer.server_relay = true
        multiplayer.set_multiplayer_peer(peer)
We will now connect any player that has joined the lobby. They will create a peer that connects to the server with that player's Steam ID. We can connect the player after they have successfully joined the server's lobby.
func _on_lobby_joined(this_lobby_id: int, _permissions: int, _locked: bool, response: int) -> void:
    if response == Steam.CHAT_ROOM_ENTER_RESPONSE_SUCCESS:
        # Do other lobby initialization here
        var id = Steam.getLobbyOwner(this_lobby_id)
        # Only create a client if this player is not the host.
        if id != Steam.getSteamID():
            # Create a client peer and connect to the host
            var peer: MultiplayerPeer = SteamMultiplayerPeer.new()
            var server_steam_id: int = Steam.getLobbyOwner(this_lobby_id)
            peer.create_client(server_steam_id, 0)
            peer.server_relay = true
            multiplayer.set_multiplayer_peer(peer)
When peer.server_relay is set to true, clients do not communicate directly with each other but are routed through the server peer instead. This enables two things:
- It simplifies the network topology. Each client only needs a connection to the server, not to every other player in the session.
- When the host has already loaded the scene containing the MultiplayerSpawner, clients will still be able to join the game. Without setting server_relay to true, the server may only load the game scene when every peer has connected.
MultiplayerSpawner
The MultiplayerSpawner node replicates nodes from the authority to other multiplayer peers. To spawn multiple players in the same scene, the server should create a player instance for every peer that has connected and set the authority for that player.
I suggest adding a node to your main game scene that handles all multiplayer related tasks, its children are a node to all hold players and the MultiplayerSpawner node. Your scene setup should look like this:
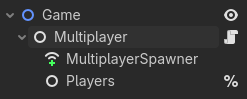
We can configure the MultiplayerSpawner node to spawn all Player instances that are direct children of the %Players node to all peers.
func _ready() -> void:
    # Only the server should manage spawning. The MultiplayerSpawner node will replicate to other peers.
    if not multiplayer.is_server():
        # Let the server (peer ID = 1) know that we are ready to play the game.
        player_is_ready.rpc_id(1)
        return

    # If we are the server, we can spawn a player for ourselves.
    spawn_player(1)

@rpc("any_peer", "call_local", "reliable")
func player_is_ready() -> void:
    # Get the peer ID of the sender of the RPC.
    var sender_id: int = multiplayer.get_remote_sender_id()
    # Spawn a player for the sender.
    spawn_player(sender_id)

func spawn_player(id: int) -> void:
    var player: Player = player_scene.instantiate()
    # The MultiplayerSpawner relies on node names to sync correctly across peers.
    # We will also use this to set the authority later.
    player.name = str(id)
    %Players.add_child(player)
There is a lot to unpack in this code, so let's walk through it.
In the _ready() function, the server just spawns a player for itself with peer ID 1. The peer, however, calls the player_is_ready() function on the server.
When the player_is_ready() function gets called on the server, the server spawns a player for the peer with its peer ID.
Finally, the spawn_player() function actually instantiates a node for a player and sets the name to be the peer ID that connected.
MultiplayerSynchronizer
At this point, the server has spawned the player instance and has authority over it. To let the peer directly control the player instance and determine its properties, we need to set the authority to the peer.
In the player class, we can add the following code.
func _enter_tree() -> void:
    set_multiplayer_authority(int(name))
As soon as the player instance enters the tree, we set the authority to the name of the instance, which we previously set as the peer ID.
Note
The reason we want to set the multiplayer authority in the _enter_tree() method instead of the _ready() method, is that MultiplayerSynchronizer node starts the spawn synchronization of parameters after the _enter_tree() has finished, but does not end the synchronization until after the _ready() method has finished. During this synchronization, we are not allowed to change the authority.
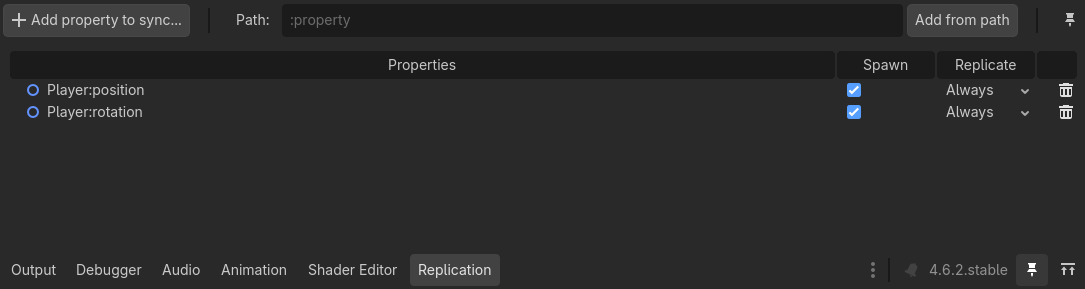
The MultiplayerSynchronizer node dictates which properties of an instance we want to replicate from the authority to other peers. For a game with multiple players, we want to at least sync the position and rotation of our player instance to our peers. The scene setup for a player should look like this:
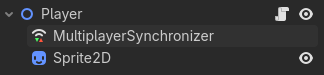
And add the properties you want to sync across peers on the Replication tab of the MultiplayerSynchronizer node.
If we are the authority of a player, we of course want to move the player around. But you don't want to attempt to move other player instances. You can always check before doing any processing whether you are the authority of the player instance.
func _physics_process(_delta: float) -> void:
    if not is_multiplayer_authority():
        return

    # Move the player and do physics calculations
Removing Disconnected Peers
When a peer disconnects, the server should remove the player object that the peer had the authority over. Since we set the player instance to have its name equal to the peer ID, we can remove the node based on the peer that disconnected.
# In the multiplayer script.

func _ready() -> void:
    # Only the server handles removing players.
    # The MultiplayerSynchronizer will remove the player from all other peers automatically.
    multiplayer.peer_disconnected.connect(remove_player)


func remove_player(id: int) -> void:
    # If the peer still has a player instance.
    if %Players.has_node(str(id)):
        # Remove that player instance.
        %Players.get_node(str(id)).queue_free()
Up Next
That concludes the SteamMultiplayerPeer tutorial. At this point, you can synchronize additional data such as world objects and scores, expand on the lobby creation, and handle edge cases like the host disconnecting and migrating authority to another peer.
You can also check out the other networking tutorials.
Keep in mind this code is intentionally simplified; it should not be used for production but more for a very simple guide on where to start.
Additional Resources
Video Tutorials
Prefer video tutorials? Feast your eyes and ears!
'Godot 4 Steam Multiplayer' by Gwizz
'Godot 4 Steam Multiplayer: New' by Gwizz
'GodotSteam and SteamMultiplayerPeer' by Michael Macha
Text Tutorials
Like reading? Check out this terrific text tutorial!
'GodotSteam and SteamMultiplayerPeer' by Michael Macha
Example Project
Later this year you can see this tutorial in action with more in-depth information by checking out our upcoming free-to-play game Skillet on Codeberg. There you will be able to view of the code used which can serve as a starting point for you to branch out from.